
Environment Setup: dbt + Snowflake Basics
Elin gets her first dbt model running against Snowflake — warehouses, profiles, and the edit-run loop, deliberately without Git yet.
Part 2 of 5— GitOps with Snowflake & dbt
- Why DevOps for Data?
- Environment Setup: dbt + Snowflake Basics
- Version Control: Monorepo & CODEOWNERS
- Automating with CI: GitHub Actions for dbt
- Full GitOps Flow: Deploy, Promote, Rollback
By Wednesday the panic had settled into something quieter. Mikael had reconstructed the revenue view as best he could from an old BI export, the sales team was double-checking numbers by hand, and Johan was still somewhere in the fjords, blissfully unaware of any of it.
Mikael stopped at Elin’s desk with two coffees. “Forget fixing the process for now,” he said, handing one over. “I want something smaller. Just get a model running — something simple. Let’s see dbt actually talk to Snowflake before we worry about anything else.”
Elin, Johan, Mikael, and Nordicvinter Retail are fictional — the story continues from Part 1. The lessons are real.
That’s the right instinct, and it’s the shape of this entire post. No Git yet. Just two new tools, introduced one at a time, so neither gets lost in the noise of the other. (If you missed how a hand-edited production view broke Nordicvinter’s revenue reporting, start with Part 1.)
Step 1: A Snowflake Account You Can Break
If you don’t already have access to a Snowflake instance, Snowflake offers a free 30-day trial with credits, which is plenty for learning. A few concepts worth understanding before you start clicking around, because the vocabulary trips up almost everyone new to Snowflake:
- Warehouse — in Snowflake, this doesn’t mean “the whole system.” It means a unit of compute — the engine that actually runs your queries. You can resize it, pause it, and pay only while it runs.
- Database — a logical container for schemas. Think of it as the top-level folder.
- Schema — a folder inside a database, grouping related tables and views together.
- Role — what determines what a user is allowed to do. Snowflake ships with defaults like
ACCOUNTADMIN(full control — don’t use this for daily work) andSYSADMIN(can create warehouses/databases).
A useful mental model: database/schema/table is where your data lives, and warehouse is what computes on it. They’re independent — a tiny warehouse can query a huge database, or vice versa.
Create one small warehouse (Snowflake calls the smallest size X-Small), one database, and one schema. You can click
through the UI for this, but doing it in SQL shows you there’s no magic involved — open a worksheet and run this once:
-- One-time setup: run in a Snowflake worksheet as SYSADMIN.
use role sysadmin;

-- Compute: the smallest warehouse, set to pause itself when idle
-- so it doesn't quietly burn through your trial credits.
create warehouse if not exists learning_wh
  warehouse_size = 'XSMALL'
  auto_suspend = 60          -- seconds of inactivity before pausing
  auto_resume = true
  initially_suspended = true;

-- Storage: one database with your personal dev schema, plus a RAW
-- schema to hold the source data our first model will read from.
create database if not exists nordicvinter_dev;
create schema if not exists nordicvinter_dev.elin_dev;
create schema if not exists nordicvinter_dev.raw;
Swap elin_dev for your own name. These are exactly the names the dbt connection profile in Step 3 points at, so
everything from here on lines up.
Load Nordicvinter’s Story Data
An empty warehouse teaches nothing, so let’s load the week that caused all the trouble in Part 1 — one week of orders and payments, ending the weekend before that Monday leadership meeting. Run this in the same worksheet:
use schema nordicvinter_dev.raw;

create or replace table orders (
  order_id     integer,
  customer_id  varchar,
  order_date   date,
  order_total  number(10, 2)
);

insert into orders values
  (1001, 'C-014', '2026-07-06', 1450),
  (1002, 'C-102', '2026-07-06', 2300),
  (1003, 'C-033', '2026-07-07',  990),
  (1004, 'C-102', '2026-07-07', 3200),
  (1005, 'C-051', '2026-07-08', 1875),
  (1006, 'C-014', '2026-07-08',  760),
  (1007, 'C-089', '2026-07-09', 2640),
  (1008, 'C-033', '2026-07-09', 1120),
  (1009, 'C-077', '2026-07-10', 4100),  -- paid in two installments (see payments)
  (1010, 'C-051', '2026-07-10',  530),
  (1011, 'C-089', '2026-07-10',    0),  -- cancelled at checkout; kept for audit
  (1012, 'C-023', '2026-07-11',  780),  -- weekend orders: their payments
  (1013, 'C-077', '2026-07-11',  490),  -- won't settle until Monday,
  (1014, 'C-014', '2026-07-12',  380);  -- so they have no payment row yet

create or replace table payments (
  payment_id   varchar,
  order_id     integer,
  paid_amount  number(10, 2),
  settled_at   date
);

insert into payments values
  ('P-9001', 1001, 1450, '2026-07-06'),
  ('P-9002', 1002, 2300, '2026-07-07'),
  ('P-9003', 1003,  990, '2026-07-07'),
  ('P-9004', 1004, 3200, '2026-07-08'),
  ('P-9005', 1005, 1875, '2026-07-08'),
  ('P-9006', 1006,  760, '2026-07-09'),
  ('P-9007', 1007, 2640, '2026-07-09'),
  ('P-9008', 1008, 1120, '2026-07-10'),
  ('P-9009', 1009, 2000, '2026-07-10'),  -- installment 1 of 2
  ('P-9010', 1009, 2100, '2026-07-10'),  -- installment 2 of 2
  ('P-9011', 1010,  530, '2026-07-10');
  -- no rows for 1011 (cancelled) or 1012-1014 (weekend, not settled yet)
This isn’t random filler — every quirk is a piece of the story you’ll trip over, on purpose, across the series:
- The three weekend orders have no payment row yet (settlement happens Monday). They’re worth exactly 8% of the week’s revenue — the size of the undercount that made Mikael go pale in Part 1.
- Order 1011 was cancelled with a total of zero. Real source data is messy; it’s why our first model filters.
- Order 1009 was paid in two installments. Two payment rows, one order. Harmless today — remember it when we get to testing in Part 4.
That’s the entire Snowflake side of setup for now.
Step 2: Installing dbt
dbt (Data build tool) comes in two flavors:
- dbt Core — open source, runs on your own machine or in your own CI pipeline. You install it via
pip(Python’s package manager) and run everything from a command line. - dbt Cloud — a hosted service with a browser-based IDE, built-in scheduling, and a managed CI/CD experience layered on top of dbt Core underneath.
For learning, dbt Core is worth starting with — you’ll understand what’s actually happening rather than clicking through a UI. Once the fundamentals click, dbt Cloud’s conveniences will make a lot more sense.
Two quick checks before installing. First, dbt Core is a Python tool, so make sure Python 3 is on your machine:
python3 --versionIf that prints a version (3.10 or newer is fine), you’re set. If it prints an error instead, install Python from
python.org — or via your package manager, like brew install python on macOS.
Second, create a folder to work in. Everything we build across this series will live here:
mkdir nordicvinter-data
cd nordicvinter-data
Now install dbt inside it (in a Python virtual environment, so it doesn’t clash with anything else on your machine):
python3 -m venv .venv
source .venv/bin/activate
pip install dbt-snowflake
dbt-snowflake is the Snowflake-specific adapter — dbt supports many warehouses, and each needs its own adapter
package.
A deliberate simplification: we’re installing whatever the latest
dbt-snowflakehappens to be — no pinned versions, norequirements.txt, no lock file. Real projects manage dependencies explicitly, so that every teammate and every CI machine installs exactly the same versions. We’re skipping that today to keep the focus on dbt itself, and we’ll do it properly when we build the CI/CD pipeline in Part 4 — where reproducible installs stop being optional.
Step 3: Connecting dbt to Snowflake
dbt needs to know how to reach your Snowflake account. This lives in a file called profiles.yml, usually at
~/.dbt/profiles.yml — deliberately outside your project folder, because it contains connection details and should
never end up in Git (a preview of a lesson in Part 3).
nordicvinter_project:
  target: dev
  outputs:
    dev:
      type: snowflake
      account: your_account_locator
      user: your_username
      password: "{{ env_var('SNOWFLAKE_PASSWORD') }}"
      role: SYSADMIN
      database: NORDICVINTER_DEV
      warehouse: LEARNING_WH
      schema: elin_dev
      threads: 4
A few details worth calling out for beginners:
password: "{{ env_var('SNOWFLAKE_PASSWORD') }}"— even though this file lives outside the project, get into the habit of never writing a password into any file. dbt reads it from an environment variable at runtime (set it withexport SNOWFLAKE_PASSWORD='...'in your shell). Files get copied, backed up, and screen-shared; environment variables don’t.schema: elin_dev— notice this is a personal schema, not a shared one. Every developer typically gets their own schema to build in, so nobody’s half-finished work collides with anyone else’s. This is a small preview of the “dev vs. prod” idea we’ll expand on in Part 5.threads: 4— how many models dbt tries to build in parallel. Higher isn’t always better; it depends on your warehouse size.
Step 4: Your First dbt Model
Initialize a project inside directory nordicvinter-data created earlier:
dbt init nordicvinter_projectThis scaffolds a folder structure as shown below. The one that matters most right now is models/. A dbt “model” is
just a .sql file containing a SELECT statement — nothing more exotic than that. dbt handles turning it into an
actual table or view in Snowflake.
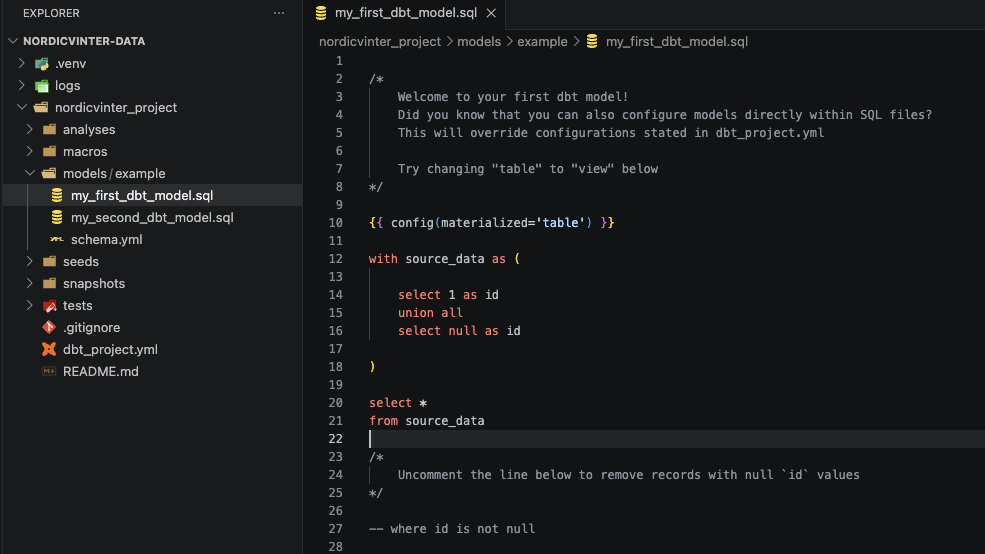
dbt also drops a couple of example models into models/example/ — worth a quick read to see the anatomy of a model, but
we’ll write our own from scratch.
You might also spot a
.gitignorefile in the screenshot and wonder about it — didn’t we say no Git yet?dbt initcreates it as standard, whether or not the project is tracked by Git. It sits there doing nothing until a repository exists, and it’ll earn its keep in Part 3, when we put this exact folder under version control.
Create models/sales_agg/sales_orders.sql:
select
    order_id,
    customer_id,
    order_date,
    order_total
from raw.orders
where order_total > 0
That’s it. No CREATE TABLE, no INSERT. dbt wraps this in the right DDL/DML behind the scenes based on how you’ve
configured materialization (as a view by default, or a table if you specify it). Note the where order_total > 0 —
that’s cancelled order 1011 being filtered out of every downstream number, in exactly one place.
The Revenue View From the Story
One model is a demo; two models are a pipeline. Let’s build the very view this series opened with — the daily revenue
that Nordicvinter’s leadership dashboard reads, as it looks after Johan’s fix from Part 1. Create
models/accounting_dm/org_revenue.sql:
select
    o.order_date,
    sum(o.order_total) as daily_revenue
from {{ ref('sales_orders') }} o
left join raw.payments p
    on p.order_id = o.order_id
group by o.order_date
The {{ ref('sales_orders') }} is your first taste of dbt templating: it points at the model we just wrote — not at a
hardcoded table name — so dbt knows org_revenue depends on sales_orders and always builds them in the right order.
That dependency graph is dbt’s superpower, and it comes from nothing more than using ref().
Declare the First Tests
Models describe what the data should look like; tests describe what must always be true about it. They’re declared the
same way — in a file, next to the models. Create models/sales_agg/schema.yml:
version: 2

models:
  - name: sales_orders
    columns:
      - name: order_id
        tests:
          - not_null
          - unique
Two declarations, and dbt can now verify — any time, on demand — that every order has an id and no id appears twice. You don’t write the checking SQL; dbt generates it. Keep this file in mind: it’s about to matter.
Step 5: Running It
dbt runThis compiles your .sql files (resolving the ref() templating) and executes them against Snowflake, creating two
views in your schema — sales_orders first, then org_revenue, in dependency order. Query the result in a worksheet:
select * from nordicvinter_dev.elin_dev.org_revenue order by order_date;Seven days of revenue — including the weekend, because the left join keeps orders whose payments haven’t settled yet.
Now re-live Part 1: change the left join back to a plain join (Johan’s original), run dbt run again, and re-query.
The weekend rows vanish and the week drops by exactly 8% — the broken Monday dashboard, reproduced on your own screen
with a one-word change. Put the left back before moving on.
One more thing before you trust these numbers: look closely at July 10th. Order 1009’s two installments mean the join sees that order twice, so its 4,100 is counted twice — the view reads 8,730 for a day that really earned 4,630. Nobody at Nordicvinter has spotted it yet either. That’s the landmine Part 4’s automated tests will step on — catching it by eyeball here is exactly the kind of luck GitOps stops relying on.
dbt testThis runs the two checks declared in schema.yml — and both pass. Sit with that for a second: the tests are green and
July 10th is wrong, at the same time. A test suite is only as good as what it thinks to assert, and nothing yet asserts
anything about org_revenue. Both halves of that problem — writing the test that catches the double-count, and making
sure tests run without anyone remembering to — are exactly where Part 4 picks up.
Elin ran both commands, watched sales_orders and org_revenue appear in her personal Snowflake schema, and — for the
first time — saw queries she’d written in a code editor turn into actual objects in the warehouse without ever opening
the Snowflake worksheet UI.
What Just Happened, Conceptually
Nothing here involved Git. That’s intentional. What you now have is:
- A local project folder with
.sqlfiles describing what tables and views should look like. - A connection profile telling dbt where to apply them.
- A working loop: edit a file →
dbt run→ see the result in Snowflake.
That loop — edit a file, apply it, see the result — is the entire foundation GitOps builds on top of.
What’s Next
That evening, Elin looked at sales_orders sitting in her personal schema and felt the quiet satisfaction of a working
loop. Then a colder thought arrived. Her model existed in exactly one place — her laptop. No history, no copy, nobody
else able to see it. If the laptop died tonight, her work would vanish as completely as Johan’s fix had vanished into
the fjords. She hadn’t fixed the problem yet. She’d built a smaller version of it.
In Part 3, we fix exactly that: putting this project under version control, understanding branches and pull requests, and — since Nordicvinter’s data team is growing — tackling the question of whether everyone’s models should live in one repository or several, plus how to control who can approve changes to which folders.
Next: Part 3 — Putting It Under Version Control (Monorepo, Branching & CODEOWNERS)